

























































You can install it with the following command:
apt-get install libapache2-mod-fcgid -y
Once installed, you will need to enable the PHP-FPM, Proxy and FastCGI Proxy module in Apache webserver.
You can enable them with the following command:
a2enconf php7.4-fpm a2enmod proxy a2enmod proxy_fcgi
Next, restart the Apache service to apply the changes:
systemctl restart apache2
Now, verify the MPM module with the following command:

apachectl -M | grep 'mpm'
You should get the following output:
mpm_event_module (shared)

Next, verify the Proxy and FastCGI Proxy module with the following command:
apachectl -M | grep 'proxy'
You should get the following output:

proxy_module (shared) proxy_fcgi_module (shared)

Step 5 – Verify FastCGI Process Manager
At this point, Apache web server is configured to use the FastCGI Process Manager. It’s time to verify if PHP is using the FastCGI Process Manager.
First, create an info.php file inside the Apache document root directory:
nano /var/www/html/info.php
Add the following lines:
Save and close the file when you are finished.

Next, open your web browser and type the URL https://your-server-ip/info.php. You should see the following screen:
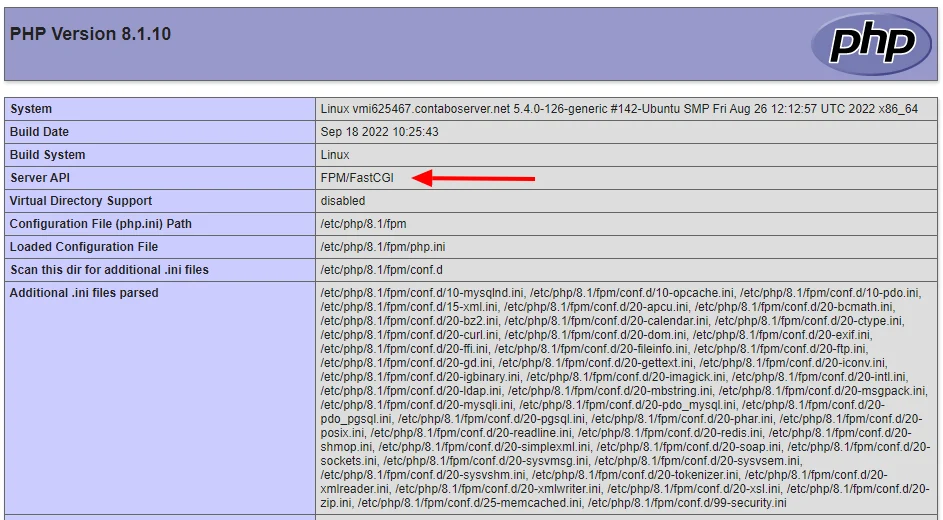
In the above page, you should see that Apache web server is using FPM/FastCGI.
Conclusion
In the above guide, we learned how to configure Apache with MPM Event and PHP-FPM on Ubuntu 20.04. Now, PHP-FPM will handle the PHP code and improve overall resource utilization.
Banda Aceh

Kota Langsa

Aceh Selatan

Aceh Tenggara
Bali

Banten
Bengkulu

DI Yogyakarta
Jakarta Pusat
Jambi
Kalimantan Barat
Kalimantan Selatan
Kalimantan Timur
Kalimantan Utara
Kalimantan Tengah
Lampung
Nusa Tenggara Barat
Palu
Pangkal Pinang
Riau
Sumatera Selatan
Sumatera Utara
Sumatera Barat
Kepulauan Bangka Belitung
Kepulauan Riau
Jawa Barat
Jawa Tengah
Jawa Timur






























































































Komentar Terbaru